Thursday, June 7, 2012

The Summer of Knitting


I've sold more toys privately in the past few months than I have in my Etsy shop. Which is fine by me. Because I'm not picky about where the money to support my knitting habit comes from. I've spent almost $120 on yarn this week (a short time after promising myself I would use up some stashed yarn before I bought anymore - which I did! Sort of). I assuaged my guilt over this frivolous expenditure by reminding myself that the money in my Paypal account (from Etsy sales) and the money I've made making baby gifts for friends and colleagues in the past couple of months more than covers that. For which I am thankful.

Because we're supposed to be pinching pennies in preparation for an upcoming move. About 1200 miles away. Oh yeah, did I mention that I got a faculty job at private university in Connecticut? Ok, well. That happened, so we're moving in the next 7 or 8 weeks. To a much more expensive part of the country. We will be reimbursed for our moving expenses, and we aren't in a dire financial situation or anything, but saving some extra money seems like a good idea.

Which is why a purchase I wouldn't ordinarily have thought twice about has inspired mild feelings of guilt. But, oh the lovely things I'm going to knit! You know, with all my free time between packing up the house and packing up the lab (my current boss has decided to move our lab to the building across the street) and finishing manuscripts and submitting manuscripts and revising manuscripts and writing rebuttal letters to editors and preparing for courses and finding a house to rent in CT and getting our house here set up with a management company to rent it out and all the other baggage that comes with a long-distance move.

So yeah, this might be a bit of a pipe dream, but I am determined to knit some amazing things with all the yarn I've just bought (and some that I've had stashed for... well, let's just say a long time). In no particular order, here are the latest additions to my knitting to-do list:

Interweave Knits' Popsicle Dress
I saw this in the latest issue of Interweave Knits and immediately wanted to make it. And Knit Picks is in the middle of a huge sale, so of course, I couldn't not invest in some Shine Sport (in Pistachio for the main color and Mongoose for the contrast) to make this adorable dress happen.


Penumbra Tee
This is in last summer's Knitscene, but I've just decided I want to make it. I'm going to use some Hobby Lobby I Love This Cotton for it. I haven't decided which color yet - either forest green or maroon.
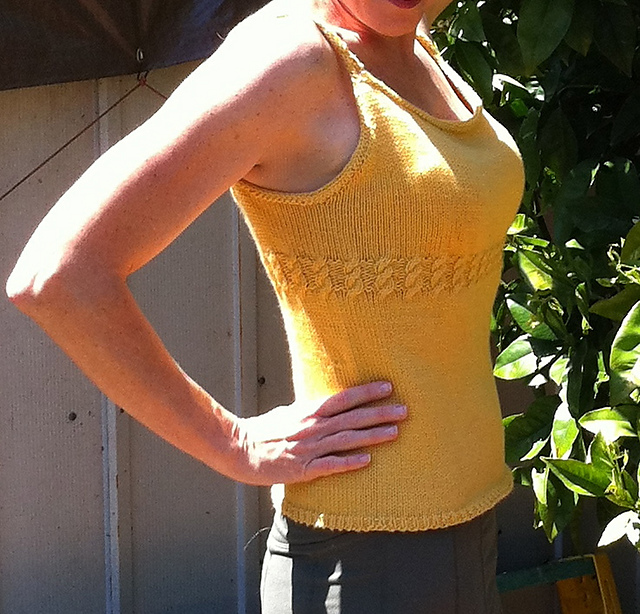


Butter Camisole
This a free download from Ravelry, and it's super cute. Perfect for summer. I bought a full bag (10 skeins!) of Knit Picks Simply Cotton worsted yarn in Wave Heather (light blue), enough for two projects. This will be one of them.


Radian Yoke
This is another project from last summer's Knitscene that I love love love. I'll be using Knit Picks Simply Cotton sport weight in Green Tea Heather for this one.


Waiting for Springtime Sweater
Another free Ravelry download. Very cute. I'll be using most of my Simply Cotton Worsted on this one (the rest is for the Butter cami).


Runcorn Cardigan
Another free pattern, and I love stripes. I'll be using a very similar color scheme (but not the yarns called for in the pattern), all from yarn already in my stash. I'll just have to buy buttons. I'm going with some dark brown Hobby Lobby I Love This Cotton as the main color, and some Knit Picks Shine Worsted in blue and fuchsia.


 Whew. All those projects are going to keep me busy for the foreseeable future. So I'll leave you with a project that I actually finished a few weeks ago (and have already worn twice - that's how much I love it) - the No Sew Breathless Sweater (free pattern, yes!). This photo is from the pattern (I don't have any pics of mine yet).

 My sweater looks almost exactly like this. Instead of Simply Cotton, like the pattern calls for, I used Knit Picks Shine Worsted in Butter Cream (a discontinued color, very similar to Willow if you click the link to see the colors) and Sailor (still tan and navy, as pictured). It took about 6.5 balls of Butter Cream and 2.5 balls of Sailor for my sweater, so I definitely used up a good bit of my yarn stash on this one.


Did I say I was done now? I lied. I'm also going to show you the project currently on my needles.


Cecily Camisole
I'm using Stroll Sock Yarn in Blue Topaz (from my stash - told you I was using up some stashed yarn) for this one.


All the toys I've been knitting lately have also used up a good chunk of my stash of Shine Worsted. So maybe I'll have room for all the yarn I've just ordered. It's going to be a busy summer.

Tuesday, February 7, 2012

Beads, beads, beads

I know that most of my crafting is knitting, but I also do a lot of bead crafts. I enjoy making jewelry (mainly for myself, but some as gifts) and stitch markers (it's the knitter in me), but mostly I love Beaded Knitting. Yes, you can knit beaded things. Really pretty beaded things.

Today I entered a really awesome giveaway over at Copper Diem. She's giving away THREE POUNDS of beads. Entries run through next week, so check it out! You should also check out Crafty Hope, who brought this great giveaway to my attention.

Sunday, January 29, 2012

Sweater Madness

I've been in a sweater knitting frenzy over here lately. But first, I knitted a pair of Irish Girlie Knits Sweet Home socks for my very best friend for her birthday (ok, so the second sock was a few weeks late). Then I got to resume working on my Cloudy Sunday sweater in Knit Picks Cadena yarn in Sagebrush. I am a little more than half way done with this sweater (so I still have quite a bit of knitting to do), but that didn't stop me from perusing new patterns. I found this little gem on Ravelry yesterday. Now I am dying to try out Indigo Mouse's Arbor short-sleeve sweater. What a gorgeous pattern! Bonus: I think I even have some yarn in my stash that will work! And if I finish it quickly, I might be able to wear it this spring!

But first, I need to finish off Cloudy Sunday. I hope I get finished before it gets too warm to wear it at least once. Or this might end up like my Delancey Cardigan - I finish it in September when it's WAY too hot to wear it (don't worry, I've worn it lots of times this winter).

That's not to mention the stacks and stacks of project boxes with yarn and patterns ready and waiting for me to just cast on already... many of which are cardigans. Because I'm obsessed with cardigans. Ooh, like this one from Knitty. I've printed and saved the pattern, but I haven't bought any yarn for it (yet...isn't that some serious self-restrain?). Then there's the Lydia cardigan (for which I do have yarn). And the Classic Lines Cardigan (for which I also have yarn). Oh! Let's not forget the beautiful, light weight Lepidoptera cardigan from Interweave Knits (for which, once again, I have already bought yarn). My subscription to Interweave Knits has probably been my downfall in the knitting to-do list department. That magazine has so many great patterns that I want to make... if only I had all the time in the world.

All right. Enough writing. It's the weekend. Time for some knitting.

Wednesday, December 14, 2011

A Christmas Treat

Toffee is probably my favorite thing to eat, period. It's crunchy and delicious and completely addictive. My mom always made it at Christmas (and only at Christmas), and I looked forward to it all year. I still do. Only now I've learned how to make it myself. Growing up, I thought that making toffee was extremely difficult and messy. Turns out, it extremely quick and easy (takes about half an hour). But since toffee is just caramelized butter and sugar, it's really Really unhealthy. But oh it's soooo gooooood.

Here's how to make your own toffee. I usually use a candy thermometer, but you don't have to.

Before you start, line a large baking sheet (or a 16" pizza pan, if you're me) with parchment paper (you can do this while the toffee is cooking if you forget beforehand). Then put four sticks (2 cups) of salted butter (this is critical) and 2 cups of sugar in a large (2 quart, I think) saucepan over medium heat. Stir it together as the butter melts. The candy thermometer is optional. When everything melts together, add 1 tsp. of vanilla.


Keep stirring pretty often once the mixture gets bubbly.


Keep stirring, making sure nothing sticks to the bottom of the pot. Scorched toffee doesn't taste good. As the temperature approaches 250 degrees or so, the mixture will thicken and the color will start to deepen into a nice caramel shade. It also starts to smell like caramel.


You're aiming for the "soft crack" stage of candy making, which is 285-290 degrees F. Some people can tell when the toffee is ready to pour just by the color (a little darker than the photo above) and the smell. I turn off the heat when the toffee reaches 285 degrees (it gets a little hotter than that by the time I pour it). I keep a little piece of parchment paper next to the stove to place the thermometer on while I pour the toffee.


Use your spoon to spread the hot toffee into a thin layer over your pan. Then pile on some chocolate chips (1 to 1 1/2 cups). I like semi-sweet Ghirardelli chips, but you can use whatever you like.


Use a rubber spatula to spread the melted chocolate all over the top of the toffee. You could also sprinkle some sliced almonds over the chocolate while it's still gooey, which is delicious, but I didn't have any almonds, so this batch of toffee just got chocolate topping.


Pro tip: everything sets faster in the fridge. I let the pan cool on the stove or counter for about 15 minutes then pop the whole thing in the fridge (use a towel or potholder - the pan is going to be HOT). Once it's set, break the toffee into small pieces and store at room temp in an airtight container (like a cute Christmas tin).

If you soak your pot, spoon, and thermometer overnight, clean-up is easy, too.

Monday, December 5, 2011

Giveaway!

I've said it before, now I'm saying it again. I'm a bad blogger. And there's something I should have posted on here DAYS ago, but I'm just now getting around to it. I'm sponsoring my first giveaway! You can find it over at Mommy's Moments. They have a lot of great sponsors for the Blog Bash Christmas giveaway. My contribution is this cute little guy:


The giveaway ends tomorrow, so head over now and check out how to enter!

Tuesday, November 29, 2011

Facebook

Hi everyone! It's been a while since I posted here. Just wanted to put it out there that LaTina Steele Designs now has a Facebook page! Feel free to click the Like button over there on my sidebar ;-)

Saturday, September 10, 2011

Breakfast!

I'm not sure this qualifies as "crafty," but I'm posting it here anyway. We've been experiencing cooler than normal temperatures here in Mobile this week, after Tropical Storm Lee, and it has me craving all things pumpkin. So this morning I'm making Chocolate Chip Pumpkin Muffins for breakfast. I modified a recipe from Allrecipes.com to make these amazing fall breakfast treats.

I started using my modified version of this recipe last fall, and Max LOVES them. They were the first muffins he ever liked, and are by far his favorite muffins. And they have veggies in them, so I definitely win.

Here's my version:
  • 3/4 c. brown sugar
  • 1/4 vegetable oil (I used canola)
  • 2 eggs
  • 1 c. canned pumpkin
  • 1/4 c. water
  • 3/4 c. whole wheat flour
  • 3/4 c. all purpose flour
  • 3/4 tsp. baking powder
  • 1/2 tsp. baking soda
  • 1/4 tsp. salt
  • 1/4 tsp. ground cloves
  • 1-1/2 tsp. ground cinnamon
  • 1/2 tsp. ground nutmeg
  • 1/2 c. semi-sweet chocolate chips
Preheat oven to 400 F, and line a 12 cup muffin tin with paper liners. Combine flours, baking powder, baking soda, salt, and spices in a bowl. In another large bowl, mix sugar, oil, and eggs then add pumpkin and water (I use a wire whisk and mix everything by hand). Stir in the dry ingredients then mix in the chocolate chips. Evenly divide the batter among the 12 muffin cups (each one will be almost full) and bake for 20 minutes.